
In Unreal Engine 5, crafting realistic and immersive landscapes relies heavily on the power of landscape materials. These materials dictate how your terrain appears, allowing you to define the look and feel of everything from lush grasslands to rocky mountains. This blog post dives into the world of layered materials, a technique that gives artists significant control over different terrain features. We'll walk you through the process of setting up a basic multi-layer landscape material, giving you the ability to create diverse and visually stunning landscapes for your Unreal Engine 5 projects.
Before diving into materials, let's establish our canvas! You can create a new landscape in Unreal Engine 5 by switching to Landscape Mode and selecting "New" under the "Manage" tab. Alternatively, you can use the default landscape provided when you open a new level. Unreal offers sculpting tools for terrain design, but for now, we'll focus on a basic setup that allows us to "paint" different areas with textures like grass, dirt, and rock.
Building a Multi-Layered Material
We'll begin by creating a new material named "MM_Basic_Landscape" and opening it in the material editor. To enable control over the landscape's appearance within the material, we'll check the "Material Attributes" box on the master material output node. We want to set up three distinct layers: "Grass," "Dirt," and "Rock." Each layer will have a base colour assigned (green for grass, brown for dirt, and grey for rock). We'll increase the level of detail by incorporating normal maps for each layer. These normal maps are just texture samples referencing pre-defined textures; however, due to the size difference between the textures and the landscape, we need to implement tiling logic. This ensures the textures repeat seamlessly across the vast landscape surface. Once the tiling is set up, we can connect the tiled UV coordinates to the texture sample nodes for each layer.
To achieve the blending between our "Grass," "Dirt," and "Rock" layers, we'll use the Landscape Layer Blend node. This node allows us to control the transition between the different textures. We'll create two separate Landscape Layer Blend nodes: one for blending the base colours (green, brown, and grey) and another for blending the normal maps. Each base colour texture and normal map is plugged into its respective Landscape Layer Blend node. These nodes have weight inputs that determine which layer is visible in the final output. By adjusting these weights, we can control the the transitions between the different terrain types.
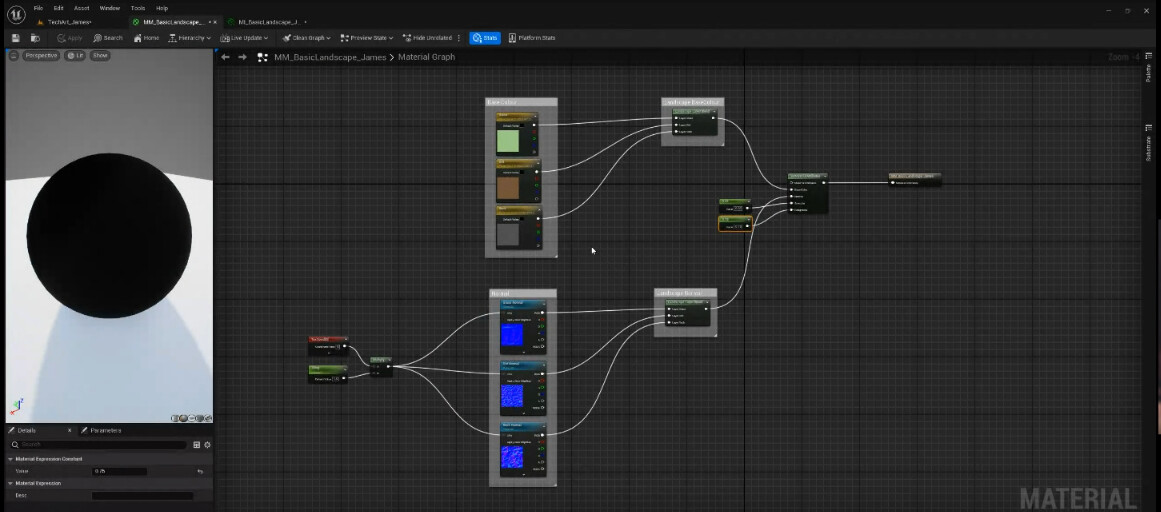
Next, we'll create a Set Material Attributes node. This node allows us to expose the blended base colour and normal map outputs to the material's final output. We connect the output of the base colour blend to the base colour input of the Set Material Attributes node, and similarly, the normal map blend output to the normal map input. Finally, the output of the Set Material Attributes node is connected to the Material Output node, defining the final output of the material. After making these connections, hit "Apply" and "Save" to finalize the material creation. This will allow us to start setting up our landscape layer info.
Don't be alarmed if applying a material instance of this material to your landscape initially results in a completely black terrain. This is because the material currently lacks layer information. To address this, we'll switch back to Landscape Mode and navigate to the "Paint" tab. Under "Target Layers," you should now see three entries corresponding to the layers defined in the material: "Grass," "Dirt," and "Rock."

Painting the Landscape
For each of these layers, locate the small "+" symbol and click on it. From the dropdown menu, select "Weight Blended Layer." This action creates a dedicated folder within the landscape data to store the weight information for each layer. Weight information essentially determines the strength of each layer's influence on the final terrain appearance, allowing you to paint specific areas with varying degrees of "Grass," "Dirt," or "Rock."
It's recommended to create an additional "Edit Layer" within the landscape. Name this layer "Paint" to easily identify it. This layer will serve as the active layer when using the paint tool in Landscape Mode. Whichever layer you select in the "Target Layers" section will be painted onto the landscape using the "Paint" Edit Layer.
I noticed the initial material resulted in a very shiny landscape. While I opted to create parameters for specular and roughness with constant values, there's an alternative approach. You can leverage the Material Attributes node we previously created. By exposing "Roughness" and "Specular" parameters within the Set Material Attributes node, you gain control over these properties directly from the Material Instance applied to the landscape. This offers greater flexibility when adjusting the material's overall shininess.

Now that we have the basic painting functionality, feel free to replace the flat base colours with texture samples. Ensure the UV coordinates are properly connected to the texture samplers for accurate texture mapping on the landscape.
Advanced Blending Techniques
Currently, we're using weight blending to transition between the layers. However, Unreal Engine offers other blending options: height blending and alpha blending. Since the grass layer serves as the foundation, a weight blend works well for it. However, for the dirt and rock layers stacked on top, we can leverage height blending for both the base colours and normal maps. This technique introduces additional detail by using the height information from the textures to influence the blending, creating a more natural transition between terrain types.

It's good practice to include all three blend types ("Alpha," "Weight," and "Height") in your materials, as recommended by Unreal Engine. While you might not use them all immediately, having them readily available can be beneficial for future modifications or adherence to engine expectations. Therefore, I recommend creating an "Alpha Blend" layer named "Do Not Use." This serves as a placeholder and ensures these additional blend options are readily accessible if needed in the future.

To introduce depth variation to the dirt and rock layers, we'll utilize a basic noise texture as a heightmap. This texture will influence the blending process, creating a more natural and uneven terrain surface compared to the flat grass layer. We'll establish controls for tiling and intensity using scalar parameters. These parameters allow you to adjust the scale and strength of the noise effect, giving you control over the level of detail and variation in the final terrain appearance.


To leverage the heightmap in the Landscape Layer Blend node, we need to modify the layer type for both dirt and rock layers. Within the details panel of the Landscape Layer Blend node, change the layer type from "Weight Blend" to "Height Blend" for both the base colour and normal map inputs. This change introduces an additional pin labelled "Height." Here, we can connect the output from the "Reroute" node we previously created, which carries the noise texture information.
By including the heightmap into the blend, the dirt and rock layers will have a three-dimensional quality, blending with the underlying grass layer. Painting different layers onto the landscape now shows a more natural, "noisy" edge compared to the previous, flat blend.

Procedural Mesh Spawning for Vegetation
Now that we've established a solid foundation with base textures and normals for the rock and dirt layers, let's get into the exciting world of procedural mesh spawning. This technique allows us to automatically spawn 3D models on the appropriate landscape layers.
To populate our landscape with vegetation, we'll leverage Unreal Engine's "Landscape Grass" type. This tool allows for control over the procedural spawning of meshes on specific landscape layers. Right-click in the Content Browser and create a new "Landscape Grass" type and name it appropriately, such as "LG_Grass".
Within the "LG_Grass" properties, you'll find a "Grass Varieties" list. This list defines the pool of meshes that can be spawned on the landscape. Feel free to add your desired grass meshes to this list, allowing for variation in the final foliage spawned.
Now that we have the mesh list defined, let's integrate it into the material graph. Add a "Landscape Grass Output" node and set the "Grass Type" property to "LG_Grass," ensuring it references the type we just created.
Next, we need to identify the areas where grass should be spawned. This is achieved by incorporating a "Landscape Layer Sample" node. Name this node "Grass", ensuring the name precisely matches the corresponding layer in the material ("Grass"). Connect the output of the "Landscape Layer Sample" node (essentially a mask representing the presence of grass) to the "Grass" input of the "Landscape Grass Output" node.
By connecting these nodes, we establish a clear link between the "Grass" layer in the material and the "LG_Grass" type. This instructs the engine to spawn grass meshes from the defined list onto the specific areas identified by the "Grass" layer sample. In simpler terms, the "Grass" layer sample acts as an instruction for where grass meshes should appear on the landscape.
While this setup samples all points on the "Grass" layer, it can lead to a significant performance drop due to the sheer number of spawned meshes. To maintain a smooth frame rate, you'll want to adjust the "Landscape Grass" spawner settings. Here are some key improvements to the landscape grass type:
- Reduce Density: Lower the density value to control how many grass meshes are spawned, reducing the overall number of rendered objects.
- Adjust Culling Distance: Set the culling distance to determine the maximum viewing distance at which grass meshes are rendered. Objects beyond this distance will be culled (hidden) from rendering, improving performance.
-
Scale and Rotation Variation: Introduce randomness in the scale and rotation of spawned meshes. This prevents a repetitive, unnatural look and adds a touch of realism to the grass distribution.


Another performance tip within the "LG_Grass" type itself is to disable dynamic shadows for the spawned meshes. Dynamic shadows are computationally expensive, and for small objects like grass, they often have minimal visual impact. Disabling them can significantly improve performance without sacrificing visual quality.
The concept of "Landscape Grass" might be slightly misleading, but don't let the name fool you! While it’s great for spawning vegetation, like grass, its functionality extends far beyond grass. For the rock and soil layers, we'll create separate "Landscape Grass" types named appropriately, like "LG_Rocks" and "LG_Soil." Within these types, you have the freedom to populate the "Grass Varieties" list with any desired mesh. This means rocks, branches, pebbles, or any other 3D model can be included, allowing you to create a diverse and visually rich landscape. The Landscape Grass typr is super flexible: Each "Landscape Grass" type can have up to 25 different meshes in its spawn list.

Next, create a separate "Landscape Grass" type in the Content Browser, naming it "LG_Rocks". Populate the "Grass Varieties" list within "LG_Rocks" with the desired rock meshes, such as pebbles and stones.
Back in the material graph, add a "Landscape Layer Sample" node to identify areas designated as "Rock" in the landscape layer. Name this node "Rock", just as you named the landscape layer the node is sampling and select "LG_Rocks" as the landscape Grass type to be spawned. Connect the output of the "Rock" layer sample node to the corresponding "Rock" input of the "Landscape Grass Output" node. By establishing this connection, we instruct the engine to spawn rock meshes from the "LG_Rocks" type specifically onto areas defined by the "Rock" layer sample.

While we've covered the fundamentals of landscape layer materials and procedural mesh spawning, there's room for further exploration to add unique details. Here are some creative techniques you can experiment with:
- Scattering Flowers: To create natural-looking patches of flowers, consider using a noise node or noise texture. This creates a mask defining areas where flowers can potentially appear. You can then invert this mask to identify suitable locations for flower meshes, adding some variety to your landscape.
- Subtracting Layers: Landscape materials offer powerful layer manipulation capabilities. Imagine you want to spawn specific meshes only in areas with grass but no rocks. By subtracting the "Rock" layer sample from the "Grass" layer sample, you can create a new mask representing areas that meet this criteria. This mask can then be used to control the spawning of meshes specific to grassy areas without rocks.
These are just a few examples, and the possibilities are endless! Try experimenting with different techniques and layer combinations on your projects!

While this procedural mesh spawning technique is great at populating landscapes with smaller, non-colliding objects like grass, rocks, and pebbles, it has its limitations. For example, we are unable to select and shift individual meshes that have been spawned in the scene. This means that if a bounder spawns where a player needs to be able to move we wont be able to shift that individual boulder manually.

So for spawning larger assets that the player can collide with, such as trees or boulders consider a technique with more control of asset placement such as Procedural Content Generation (PCG) graphs. PCG graphs are another powerful option for strategically placing larger assets like trees or boulders. PCG algorithms can consider factors like terrain features to create a natural and well-distributed placement patterns. I have some projects up on my ArtStation portfolio that demonstrate how to build PCG tools.
While this blog post focuses on procedural mesh spawning for smaller objects, it's important to acknowledge the existence of these complementary techniques. For the best landscape results, consider combining different techniques such as advanced landscape materials with PCG graphs and manual placement to get the right amount of artistic control where you need it.

Streamlining Landscape Creation with Gaea

While hand-painting landscapes offers creative freedom, it can be time-consuming for vast environments. Here's where node-based world-building tools like Gaea and Worldbuilder come in. These powerful apps use advanced simulations to create realistic terrains and, more importantly for our purposes, output detailed masks for different terrain features.
Gaea, a popular third-party tool, uses procedural noises within its node-based editor to generate grayscale maps perfectly suited for import into Unreal Engine. The complex landscape pictures pictured above was crafted entirely through Gaea's built-in noises and landscape types. These nodes generate the following masks useful for replacing or landscape layer info, reducing the need for artists to manually paint the landscape.

- Top Left → Height Map: The first mask is a heightmap and serves as the foundation for your landscape's overall shape. With some basic calculations, you can import this map directly into Unreal during landscape creation.
- Top Right → Grass Mask: This mask, represented in white, identifies areas where grass would naturally grow on your terrain.
- Bottom Left → Flow Map: This map can guide the placement of dirt textures, showing areas where water has carved paths down the mountainside.
- Bottom Right → Forest Mask: This mask shows suitable locations for tree placement, for a realistic distribution of forest areas.
By combining Gaea's output terrain masks with the material we created earlier, we can achieve stunning landscapes with minimal manual intervention. In the next blog post, we'll delve into the creation of the advanced auto-foliage landscape material you see below, so stay tuned!
